
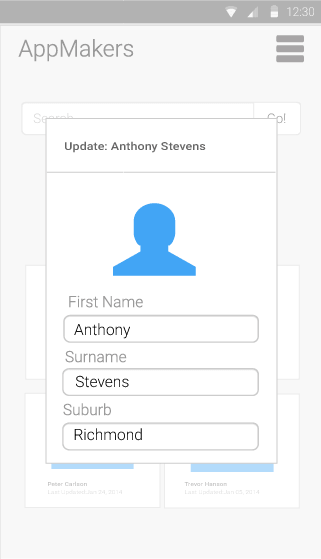
Update Customer – mobile
If you haven’t already, check out the other posts in this series: It’s easier than you think, lets build a web app
Re-cap of the requirements:
Here is a list of the requirements that we will be designing and building (this is a subset of the identified requirements for this project):
- Identify key characteristics of the current customers that use App-Makers services.
-
it("The Customer should have an Address", function() { var suburb = customer.suburb; var country = customer.country; expect(suburb).not.toBeNull(); expect(country).not.toBeNull(); }); -
 it("The Customer should have an Industry", function() {
     var industry = customer.industry;
     expect(industry).not.toBeNull();
});
-
- A record of each customer
-
describe("As an App-Makers employee, I want to create a customer record", function() {}); -
describe("As an App-Makers employee, I want to update a customer record", function() {}); -
describe("As an App-Makers employee, I want to retrieve a detailed customer record", function() {}); -
describe("As an App-Makers employee, I want to retrieve a list of customer records", function() {}); -
it("The Customer must have a first name", function() { var firstName = customer.firstName; expect(firstName).not.toBeNull(); }); -
it("The Customer must have a surname name", function() { var surname = customer.surname; expect(surname).not.toBeNull(); }); -
it("The Customer must have an email address", function() { var email = customer.email; expect(email).not.toBeNull(); }); -
describe("Customer email validation", function() { it("should validate someone@somewhere.com",function(){ var result = is_valid("someone@somewhere.com"); expect(result).toBe(true); }); it("should not validate someone@somewhere",function(){ var result = is_valid("someone@somewhere"); expect(result).not.toBe(true); }); }); is_valid = function(email){ var reg_expr = /^([A-Za-z0-9_\-\.])+\@([A-Za-z0-9_\-\.])+\.([A-Za-z]{2,4})$/; return reg_expr.test(email); }; -
 it("The Customer should have a phone number", function() {
     var phone = customer.phone;
     expect(phone).not.toBeNull();
});
-
- An indication of which customers have approached App-Makers from a referral
-
 it("The Customer should have a referred indicator", function() {
     var referred = customer.referred;
     expect(referred).not.toBeNull();
});
-
- The channel that new customers are using to contact App-Makers
-
 it("The Customer should have a channel indicator", function() {
     var channel = customer.channel;
     expect(channel).not.toBeNull();
});
-
- Solution Specific Requirements
- A user must be registered to access the system and the information contained within it.
- A user must be able to log-into the system from a mobile device, tablet, and laptop computer.
- When an attempted login fails, the user must be prompted to try again.
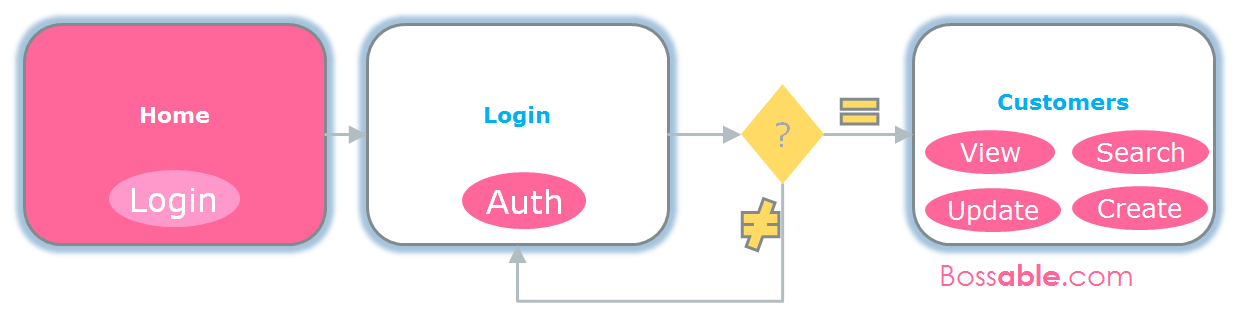
Creating a design flow based on the requirements
The requirements above can be grouped into two buckets:
- User Authentication
- Customer management
These two buckets give us two entities – Users, and Customers.
For simplicity, we’ll split each entity into it’s own page:
- Login page – for user authentication – which maps to the Users entity
- Customers page – to view, create, update and manage customer details – which maps to the Customers entity
- PLUS a Landing page – to give our app a launching pad
Mapping the requirements to the interaction design flow
To make sure that we haven’t missed anything in our flow, we’ll map the requirements to the pages:
| Page | Requirements |
|---|---|
| Customers page |
1. Identify key characteristics of the current customers that use App-Makers services. 4. A record of each customer 5. An indication of which customers have approached App-Makers from a referral 6. The channel that new customers are using to contact App-Makers |
| Login page | 9. Solution Specific Requirements |
| Landing page | There are no specific requirements for a landing page. |
Lets get visual
At this point, we have a set of requirements, and a high-level interaction flow. Now, we can start to sketch out the UI patterns for our design.
Landing Page
Interaction Flow Diagram: Landing Page
Title: Landing Page
Description: The landing page is where staff will see a brief overview of the app.
| Use Case | Storyboard |
|---|---|
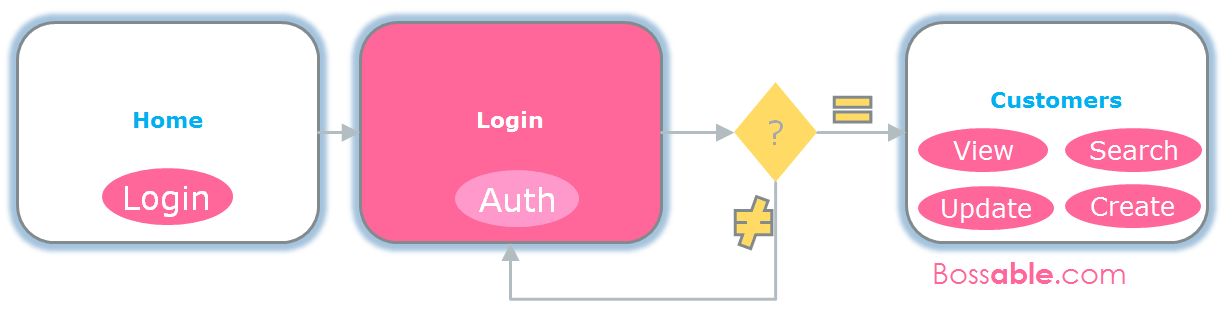
| App-Makers employee: Log into the app.
An employee must be registered to use the app. |
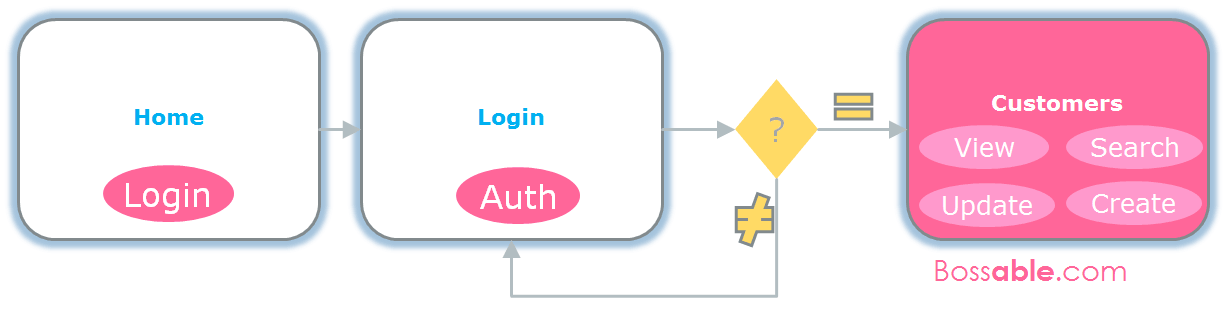
When the Login button is selected:
|
Wireframes:
(Click on a diagram to expand)
-
- Landing page – mobile
-

- Landing page – tablet / desktop
Login Page
Interaction Flow Diagram: Login Page
Title: Login Page
Description: The login page is where staff will log into the app.
| Use Case | Storyboard |
|---|---|
| App-Makers employee: Log into the app.
An employee must be registered to use the app. Employees can sign-in using the ‘Log-in’ button. |
On this page:
|
Wireframes:
(Click on a diagram to expand)
-
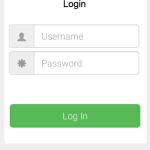
- Login page – mobile
-
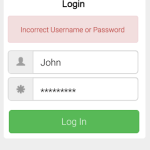
- Login page – mobile with error
-
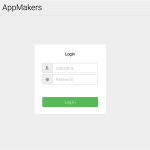
- Login page – tablet / desktop
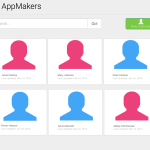
Customers Page
Interaction Flow Diagram: Customers Page
Title: Customers
Description: The customers page is where staff will be able to view, search, create, and update customer details.
| Use Cases | Storyboards |
|---|---|
| App-Makers employee: Create a Customer
Employees can create a new Customer |
After selecting the ‘New Customer’ button:
|
| App-Makers employee: Search for a Customer
Employees can search for a customer |
Select the search input box:
|
| App-Makers employee: Update Customer details
Employees can update customer details |
Select a Customer record to edit:
|
Wireframes:
(Click on a diagram to expand)
-

- Customers – mobile
-
- Customers – tablet/desktop
-
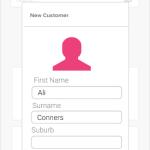
- New Customer – mobile
-

- New Customer – tablet/desktop
-
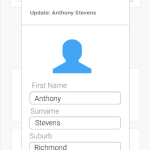
- Update Customer – mobile
-
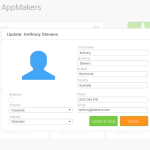
- Update Customer – tablet / desktop
Awesome, we have our high level design sorted! In the next post we’ll go through the process of setting up the MEAN stack for development.
Part seven – Getting started with the MEAN stack
Hi Shristi,
first: you did a great job on bossable.com with your 360 degree view & tutorials on how to build a great web app based on mean stack!
I have one question: do you use a specific tool for designing the interactive flow diagrams / wireframes? If so, which tool you would prefer?
Cheers, Didi
Hey Didi,
Thanks for your kind words! 🙂
I use Adobe Illustrator for process flows and wire-frames. For complex process flows, like business process re-engineering work, I use Microsoft Visio.